繁體中文 English

How to create by a computer

Can be created easily by a computer in your home to place an order right away!

  • STEP1 Launch software
  • STEP2 Edit
  • STEP3 Order

STEP2 Edit

■ Edit Screen Top

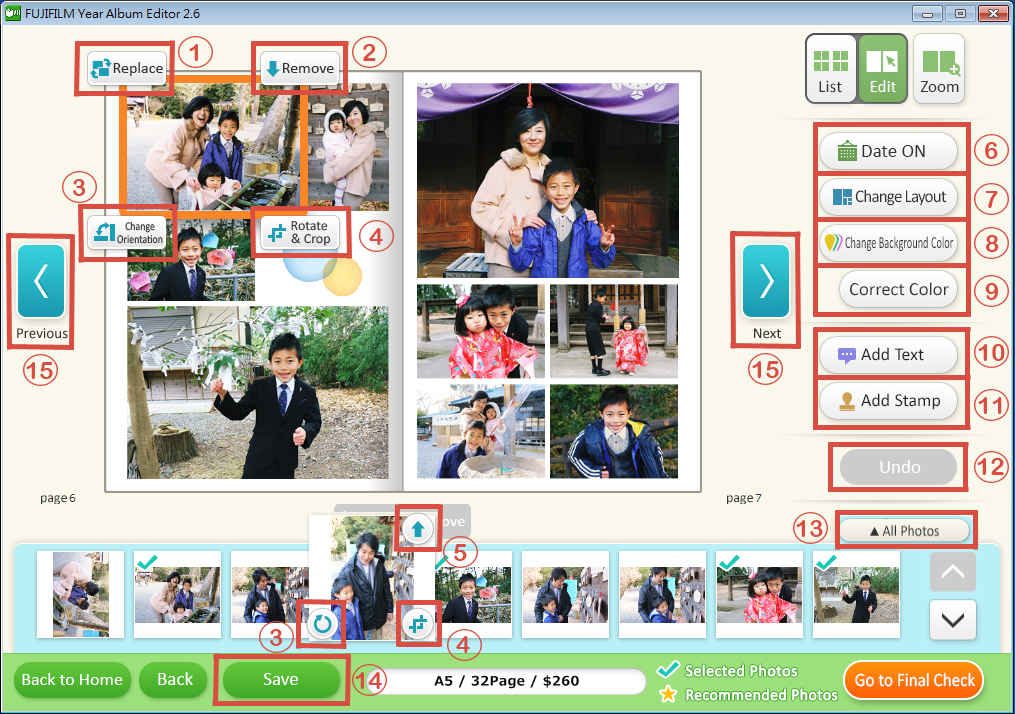
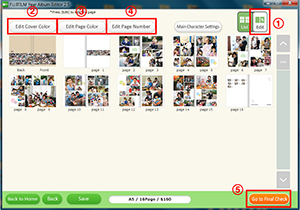
Proceed from the preview screen to display page list screen. On this screen, you will have an overview of layout of the whole Album. Select the desirable page directly or click “Edit” ①button to edit each page.

  • “Edit Cover Color”
    …Background color of the cover can be changed.
  • “Edit Page Color”
    …Background color of inside pages can be changed.
  • “Edit Page Number”
    …Number of pages can be changed.
    ※ To change the number of pages causes reset of the content.
  • “Go to Final Check”
    …Perform final checking before placing order.

■ Edit Cover

Cover and pages are edited separately. Here is the introduction of the function of each button.

  • "Title"
    …Main title of the album can be inputted. It can also be changed by clicking “Edit” button.
  • "Subtitle"
    …Subtitle can be inputted under the title with smaller characters.
  • "Spine"
    …Words inputted for title are automatically reflected on the spine.
    Subtitle cannot be reflected. Words on spine cannot be changed.
    • Font type, size and color designated in ①~③ can be changed by operation panel located at lower part of the screen.
    • Orientation of title on spine can be changed by selecting Style on the operation panel.
  • "Period/No."
    …Period or number can be input at the center of the spine.
    (Refer to ★) Select your desirable “Period”, “No.” or “None”.
  • "Zoom"
    …Use to enlarge the page.
  • “Change Layout”
    …Layout pattern of photos placed on cover and back cover can be changed.
    • Photos used on layout are arranged automatically and cannot be changed manually.
  • "Change Background color"
    …Background color of the cover can be changed.
  • "Next"
    …Go to next page.

■ Inside Front Page

Title and subtitle inputted on the cover is automatically reflected on the inside front page. Only the layout pattern on this page can be changed. ①

  • Photos used on this page are arranged automatically same as cover. Those photos cannot be changed manually.

■ Inside Pages

  • All photos including the ones selected for auto layout are displayed at the lower part of page screen “All Photos”. You can add your favorite photo manually.
  • Page layout is automatically arranged considering orientation of the photos. The layout will be changed automatically when adding, deleting and rotating photos.

Select a photo to display operation button.

  • "Replace"
    …To replace the selected photo with another photo.
  • "Remove"
    …To delete the selected photo.
  • "Change Orientation"
    …To rotate the selected photo 90 degree clockwise or counterclockwise. After rotation, the photos are rearranged and their positions on the page may change.
  • "Rotate & Crop"
    …Crop the photo by rotation, zooming in/out or moving.
  • "Add Photo"
    …To add the photo which is not on the layout.
  • "Date ON"
    …Photo shooting date will be displayed.
    • Date will NOT be printed on the Album.
  • "Change Layout"
    …Page layout can be changed within pattern containing combination of photo orientation.
  • "Change Background Color"
    …Background color of pages can be changed.
  • "Correct Color"
    …Default setting is applying automatic color correction. It can be switched to off for special photos (such as professional studio photo and illustration).
  • "Add Text"
    …To input text on the page.
    • Font type, size and color can be changed by operation panel located at lower part of the screen
  • "Add Stamp"
    …Stamp such as Season, Balloon and Greeting can be added to decorate the page.
  • "Undo"
    …Cancel the previous action.
  • "All Photos"
    …Can view photos that are not selected for the Album.
  • "Save"
    …Saved the editing Album.
  • “Previous”, “Next”
    …Go to previous and next page.

■ Change Photos

Photos can be changed in the “All Photos” tab.

  • Add photo of the same period that are not selected.
  • Photos of different period can also be added to the editing page. Open the “All Photos” tab on the editing page and click the tab with different period to select the photo.
  • Photos with no shooting date can be found on the “No Date Info” tab and can be added to the editing page.
  • New photos can be added and found on the “Added Photo” tab.
  • To move photo to a different page, delete it and adding it on the desirable page from the “All Photos” tab on that page.

■ Inside Back Page

Shooting date of photos used on each page are listed in the inside back page.

  • "Change Layout"
    …Change layout of the inside back page with the following options:
    【Page Index】Layout of double page spread are displayed in small size.
    【Page Digest】One photo from each double page spread is picked and displayed.

  • Photos cannot be edited manually.
  • The page on right-handed side is not counted as a page.

  • “Go to Final Check”
    …Perform final checking before ordering.
  • STEP1 Launch Software
  • STEP3 Order